Get Started Guide
Introduction
Welcome to the Voonix Get Started Guide! This guide will walk you through the initial setup to get your data seamlessly integrated into Voonix. By adding your brands, accounts, and deals, Voonix will automatically import your data and campaigns/trackers for streamlined data management.
What You’ll Need:
- A list of the brands you wish to add
- Account details and deal information
Let’s get started! Check out the video below for a quick overview, or follow the detailed steps outlined further down:
Step 1: Select brands
Navigate to Advertisers in the menu and click Create Multiple. A new window will open. Choose the brands you want to add to Voonix. The search bar can help you quickly find a specific operator or brand.
- Select individual brands or all brands under a single operator.
- Continue selecting alle the brands and operators you want to add, then click Next to proceed.

Additional options:
- Adding only the operator without splitting data by brand?
Simply leave all brands under the operator unselected, then click Next. - Can’t find your brand under the operator?
Select any brand from the list and click Next. In the following step, you can manually edit the brand details. (Important: Ensure you have the correct brand ID for your brand.) - Can’t find the operator in the list?
Click the Create Manual button next to the search bar to add a brand manually by entering the required information.
You can always edit brands in the following steps
Step 2: Add accounts
In this step, you’ll add your accounts by providing the required information. You can add multiple accounts and each account’s data will be displayed separately.
Click Create new login:
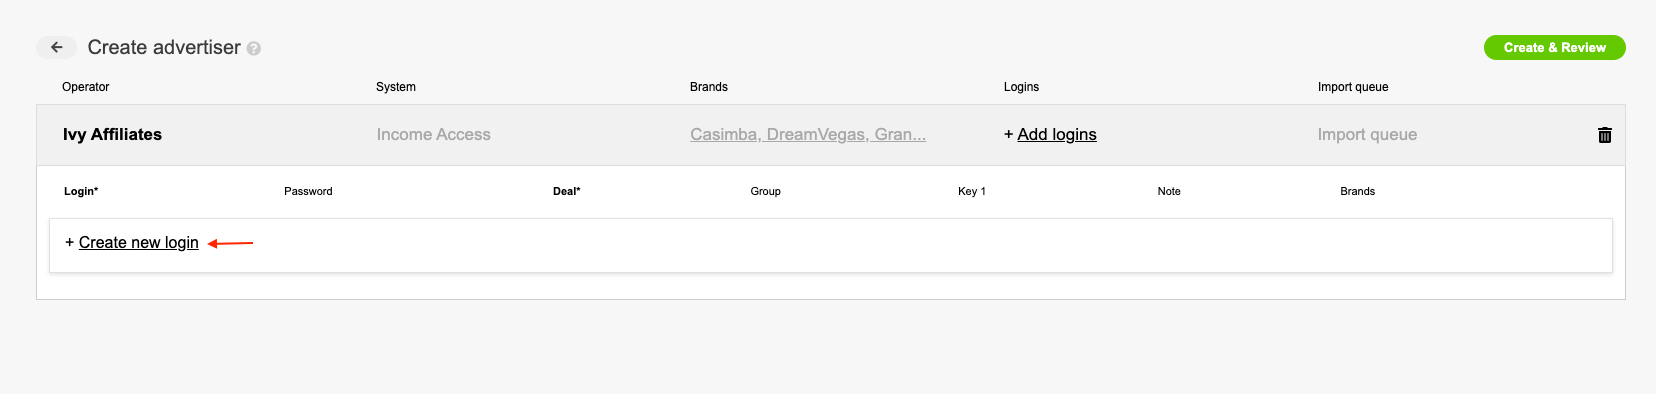
A pop-up box will appear where you can enter the account and deal information:
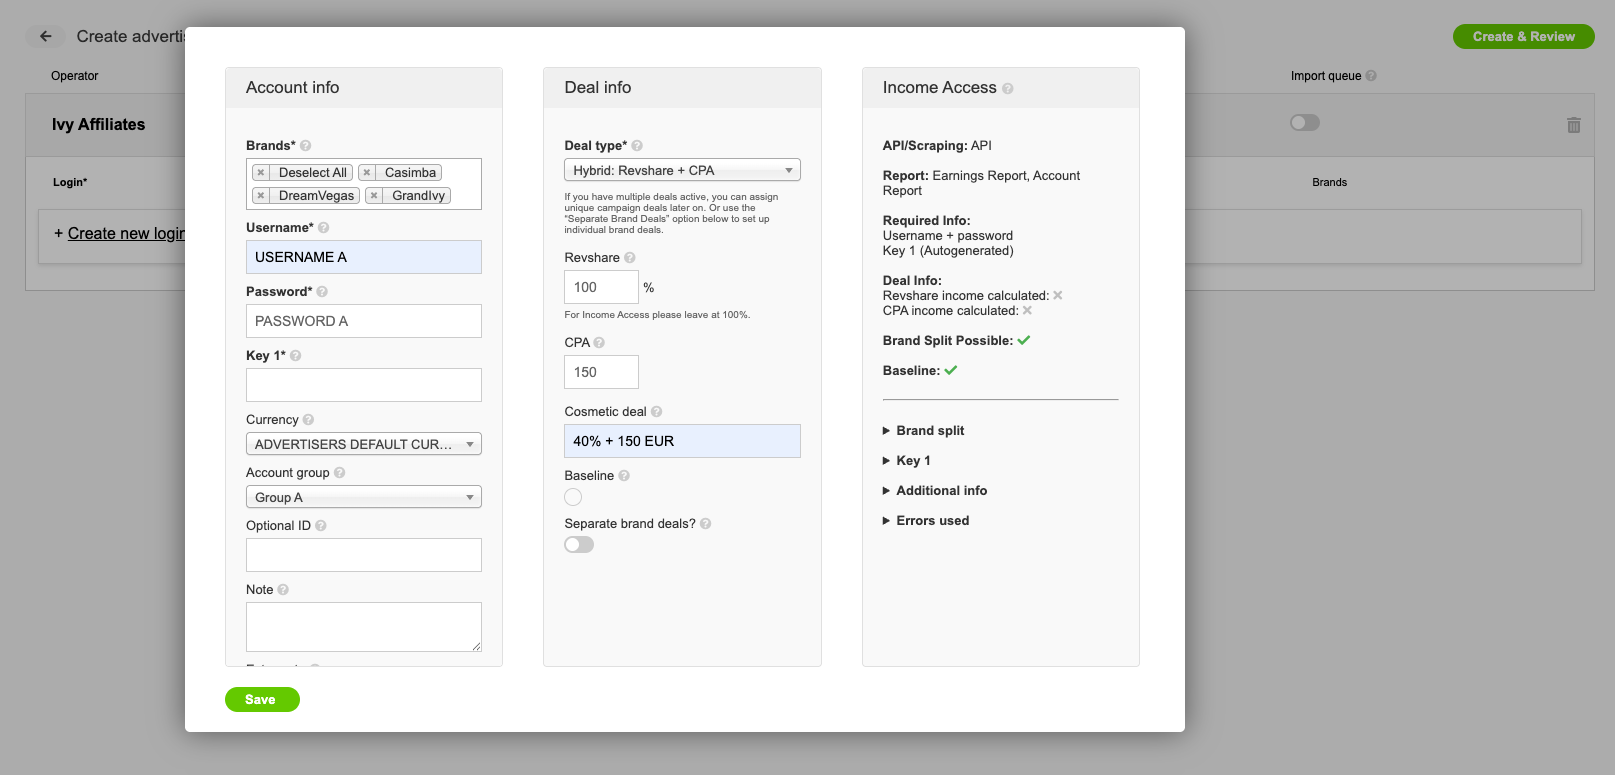
Enter the required information marked with bold and an asterisk (*). Optional fields can be filled in if needed. You will only see the fields relevant to your setup, along with optional fields you may choose to fill in.
Here’s a breakdown of the fields:
Account information
- Brands
Select the brands to associate with this account. You can choose individual brands or all the brands selected in Step 1. - Username
Enter the username for your account. - Password
Provide the password for your account. - Key 1
If data is imported via API, an API key may be required. In some cases, Voonix auto-generates these keys. In others, you’ll need to retrieve the API key from your account and add it manually. Check the Help section for guidance specific to the affiliate system, or check out our Brand Integration Guide for detailed information on the required details for each affiliate system. - Key 2
Occasionally, a second key is needed. Refer to the Help section for details specific to your case, or check out our Brand Integration Guide for detailed information on the required details for each affiliate system. - Currency
Choose the currency used in your account. By default, this matches the currency set for the brand/advertiser, which defaults to EUR unless edited. - Account group
Create or select an existing account group to organize your accounts as desired. You can use this to view your data grouped by accounts in the Account Group Report. - Optional ID
Use this field to input your own custom IDs, if applicable. - Notes and Extra notes
Add any relevant notes about this account.
Deal information
- Deal Type
Select the type of deal associated with your account. This determines how Voonix processes your data. For instance, if you select a pure revshare deal, CPA data will not be imported even if it exists. - Revshare
In rare cases, you’ll need to specify your actual revshare percentage. If Voonix cannot retrieve Revshare income from the affiliate system, we calculate it manually. Most systems do provide this data, so leave the field at 100% unless specified otherwise in the field’s note. - CPA
Add your CPA deal. If Voonix cannot retrieve CPA income from the affiliate system, we calculate it manually. If your CPA deal uses a currency different from the revshare deal, you can configure this in Voonix. - Cosmetic ddeal
Use this field to label the deal as you’d like it displayed in Voonix. This is purely visual and has no technical impact. - Baseline
Enable this option if your deal includes a baseline. If CPA counts are unavailable, Voonix will not use FTD counts as CPAs when this setting is active. Note: This functionality is limited to specific affiliate systems: MyAffiliates, Sarah Enterprises v2, Silverplay Affiliates, SoftSwiss, Prime Partners, Everflow, Online Casino Share, Bona Fodes Affiliates and RTG Sub-Id. - Separate brand deals
Enable this if your brands have different deals. Additional fields will appear for each brand to capture their unique details.
Click Save to proceed, and add additional accounts if necessary.
Manage brands:You can manage and edit brands under each operator as needed. Simply click on a brand name in the header row to make changes, delete a brand, or create a new one.
Step 3: Start data imports
Before finalizing the brand and account integration, you can initiate the import queue for your accounts. This allows data to be imported in the background, saving you from completing these steps later.
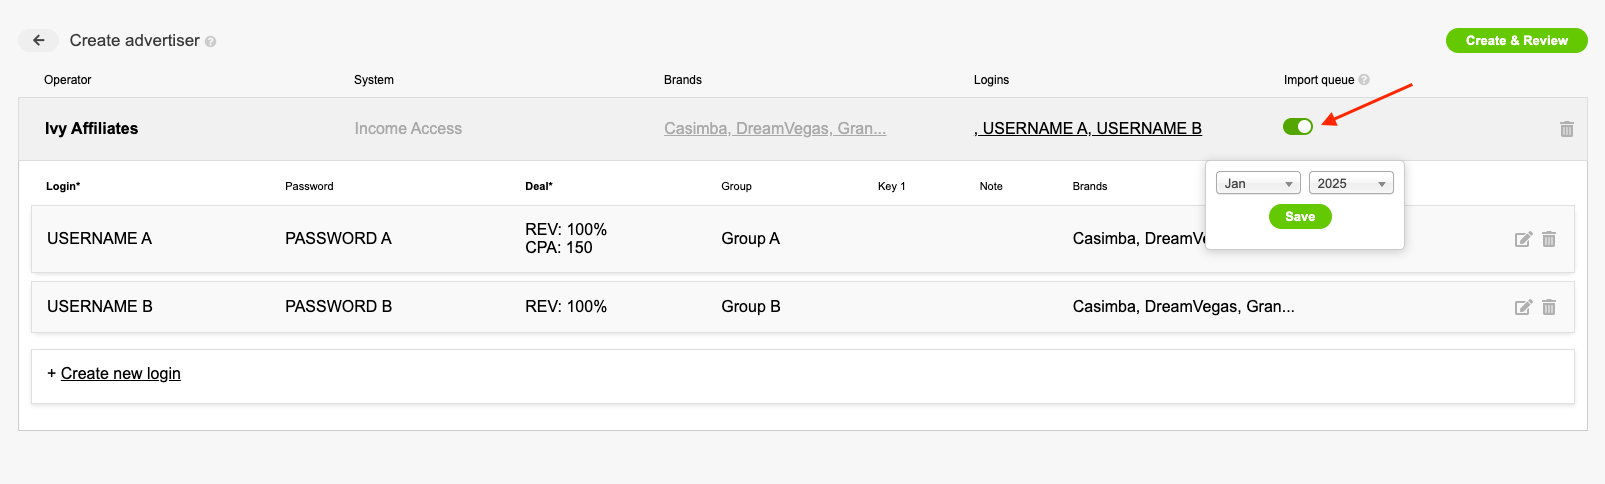
You can enable the Import Schedule toggle for each operator and select a start month for the import queue. After selecting the start month, click Save. In this example, all accounts under Ivy Affiliates will have their data imported from January 2025 up to the current month.
Step 4: Review and create
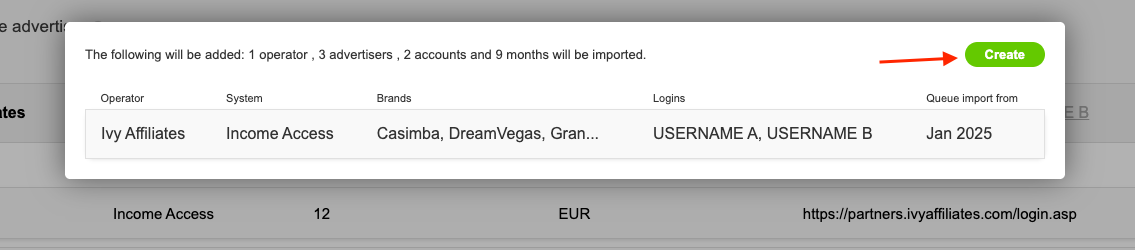
Once you have added all the desired brands and accounts, click Create and Review at the top.
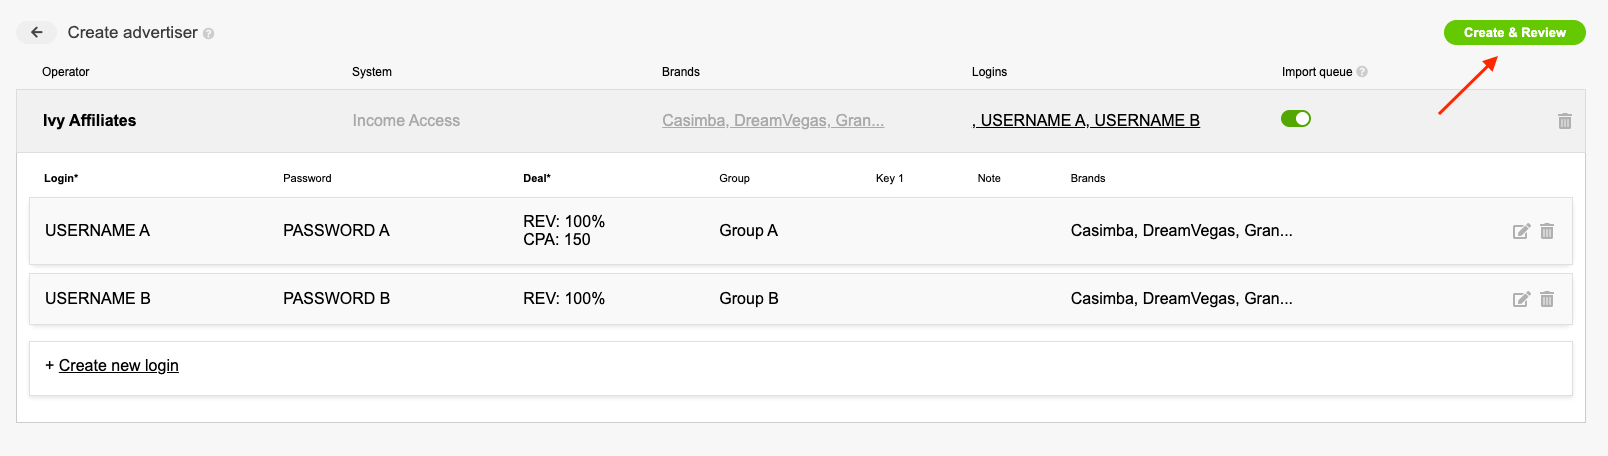
Voonix will provide a summary of the operators, brands, accounts, and scheduled imports before finalizing. If there are any issues, an error message will appear, allowing you to go back and make corrections. If everything looks good, click Create, and you’re all set!
Step 5: Viewing your data
Once you’ve successfully integrated all your brands and accounts into Voonix, you’re ready to view your data. If you scheduled data imports during the integration process, Voonix will automatically import the data in the background. You can proceed directly to the reports section to view your data:
1. Navigating to the Advertiser Earnings Report
- Go to the Advertiser Earnings section to view the main report for the current month.
- This report displays data for all the advertisers you have integrated.
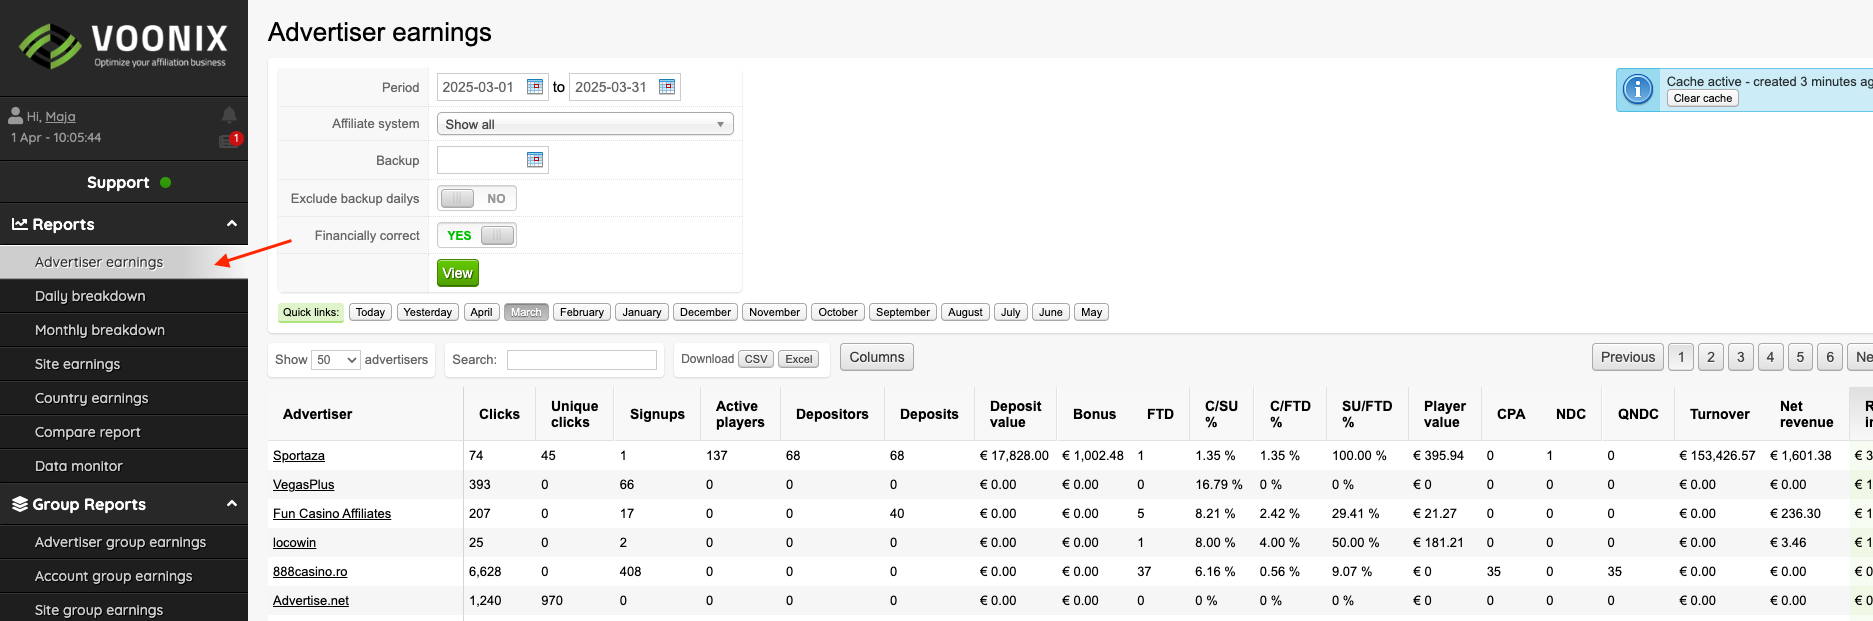
Note: If the data does not appear as expected, click the Clear Cache button in the top-right corner to refresh the page.

2. Understanding Report Levels
The Advertiser Earnings report is structured into multiple levels:
- Advertisers – Displays an overview of all integrated advertisers.
- Logins – Shows data at the account level for each advertiser.
- Campaigns – Provides insights at the campaign level.
Additional Help
Import data
Voonix automatically handles data imports for the current month, but you also have the option to manually import data, including historical data. This allows you to backfill old data into Voonix
1. Automatic Data Imports
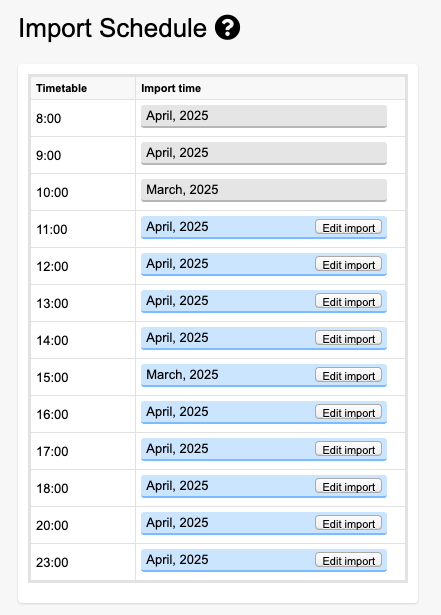
Voonix automatically imports data multiple times a day between 8:00 AM and 11:00 PM, with imports occurring approximately every two hours. You can view the exact import schedule by navigating to Import → Import Schedule.
Additionally, Voonix imports data from the previous month twice a day from the 1st to the 3rd of each month and once a day from the 4th to the 12th.
Manual imports allow you to instantly import data for a newly added brand or retrieve older historical data. If you scheduled data imports during the integration process, there is no need to run them manually.
How to import data manually
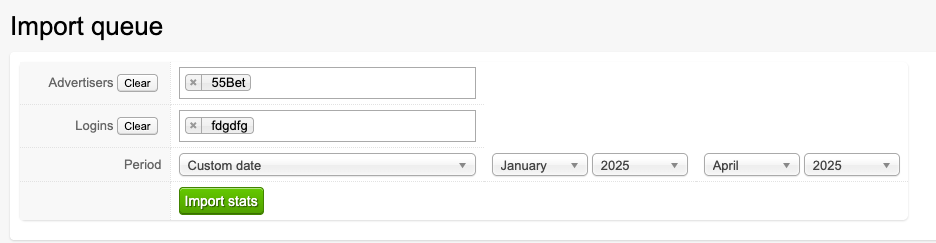
- Navigate to Import → Import Queue
- Select one or multiple Advertisers in the first filter
- Select one or multiple Logins in the second filter
- Choose the date range for the data you want to import
- Click Import Stats to begin the import process
All imports will be added to the queue and processed one month at a time.
Once the import is complete, you can view the status for each import and click the calendar icon in the Period column to access and review the imported data in your reports.
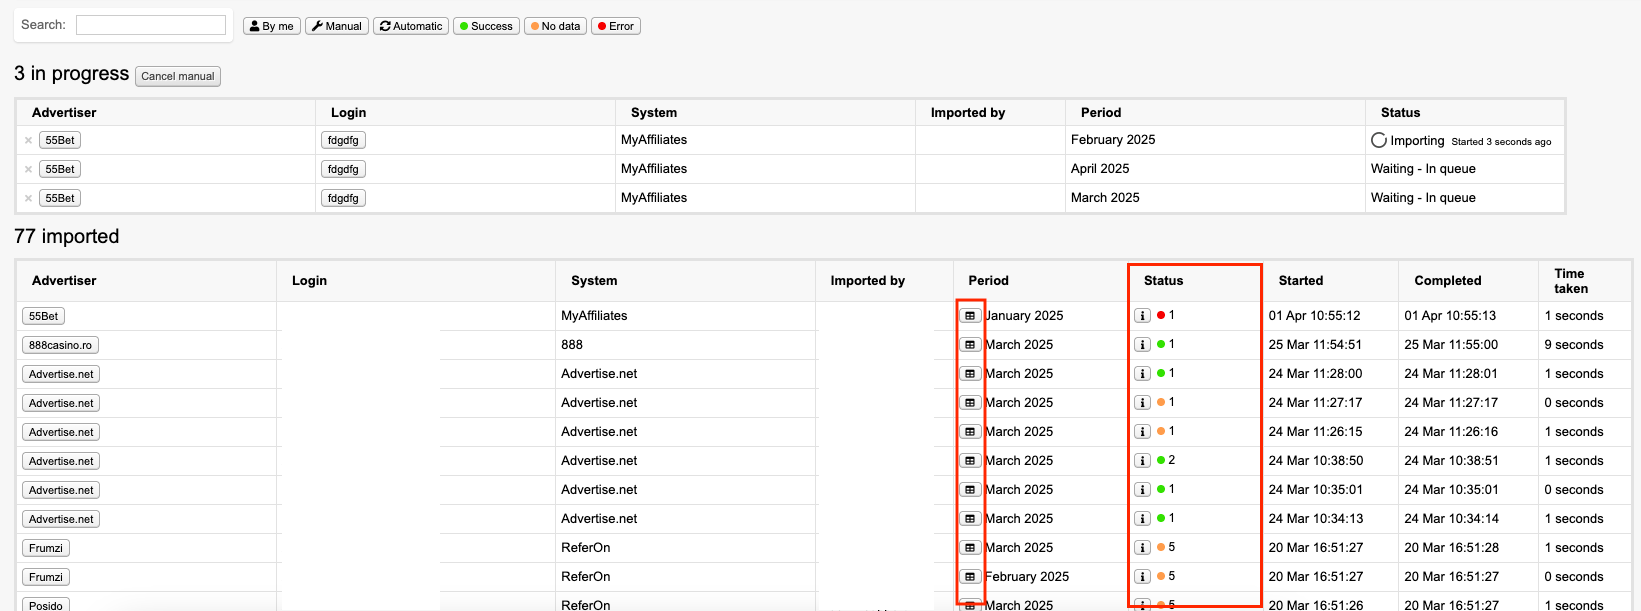
Import status definitions:
- Green: Import works and Voonix found data
- Orange: There's no issue, but Voonix found no data
- Red: Import didn't work due to an error
Troubleshooting
Once you have integrated all your brands and accounts into Voonix and the data imports have run, your data should be visible. However, errors can sometimes occur. Here are the most common issues and how to resolve them:
Data is showing, but it's wrong
If your data in Voonix doesn’t seem correct, there may be an issue with your deal settings or report matching.
Is the deal in Voonix set correctly?
Make sure you have entered the correct revenue share percentage. In most cases, this should be set to 100%, unless your account is using one of the following systems: 888, SoftSwiss, GVC Affiliates, PrimePartners, Drake Affiliates, BetFlag.it, Silverplay Affilites, Number1 Affiliates and Netrefer API. If your account is with one of these, enter the actual revenue share percentage. Also, check that your CPA deal is correctly configured
Do you have multiple deals in your account?
If you have multiple deals, you need to add them in Voonix to ensure accurate reporting. You can do this by adding Campaign Deals:
- Navigate to Campaigns in the menu
- Find and select the relevant campaign(s) by checking the box to the right
- Click Options → Deal and select the correct campaign deal along with a start date.
- Click Edit to apply the changes
Are you matching with the correct report?
Voonix pulls data from specific reports within different affiliate systems, and the data can vary between reports. Ensure you are comparing the correct reports. You can use the Data Validation module to verify which reports Voonix pulls data from and the specific data types retrieved for each account. To access this module, navigate to Import → Data Validation in the menu.
If unsure, contact us to confirm which reports we use.
The report is correct, but data is till not matching
Please reach out to support, and we will help you.
Data is not showing
Has the import run for the month you’re checking?
Voonix automatically imports data for the current month only. If you’re looking at data from previous months, you need to manually import it, as decribed in the Import data section above or during the integration process. You can track your manual imports under Import → Import Queue and Import Status.
You can also try to click Clear cache in the report.
If you have entered the correct Brand ID?
Brand IDs can vary between accounts, even within the same affiliate system. If the Brand ID is incorrect or misspelled, Voonix won’t be able to retrieve data. If a Brand ID is used, it's worth to double-check that the Brand ID matches what is in your affiliate account.
Use the Brand Integration guide to locate Brand IDs in different affiliate systems.
Only some data is missing
If some columns display zero stats while others show data, this could be due to one of two reasons:
- The affiliate system does not provide that specific data type.
- The data column name in your account is different from the standard format used by Voonix.
You can use the Data Validation module to verify which specific data types are retrieved for each account, and we normally get it or not. To access this module, navigate to Import → Data Validation in the menu.
Do you have any account issues?
Missing data can be due to an import error. See the next section for account-related issues.
You see account issues
Voonix will notify you of account issues by displaying a count in the Advertiser Logins menu. If an issue occurs, it means the import is not functioning correctly, and your data is not updating. Below are common account issues and how to resolve them.
Invalid credentials:
- Ensure your username and password are correct.
- If credentials are correct, verify that the URL is correct (found at the Advertiser level).
- For NetRefer accounts, if you receive an “Invalid credentials” error and the details are correct, click Options → Update without making any changes.
- For MyAffiliates, this error may occur due to a captcha on the login page. Voonix usually autogenerates the required keys, but this fails when a captcha is present. In this case, you’ll need to find and enter the keys manually. See the guide here.
Invalid or missing API key:
- Some accounts require an API key. Log in to your account and locate it.
- If an API key is already entered, check that it is correct.
- Use the Brand Integration Guide for instructions on retrieving API keys.
Requires Whitelisting:
- Some affiliate systems require IP whitelisting.
- Use the Brand Integration Guide to find Voonix’s IP address and whitelist it.
Terms and conditions:
- Some accounts require you to accept terms and conditions before data imports will work.
- Check your account settings for any pending agreements.
Unknown import error:
- This error appears when no specific error code is available. Please reach out to Voonix support for help.
- If you encounter this error on an Income Access account, it is often due to an inactive API. To resolve this, activate the API under API Reports in your account settings. Once enabled, the import should function correctly.