How To Guides

Last updated: August 6th, 2020

Intro

Check out these guides for more info about how to add an Advertiser, Advertiser login and much more in Voonix!

If you are only looking for getting started with your first Advertiser in Voonix, please go to our Quick Start Guide
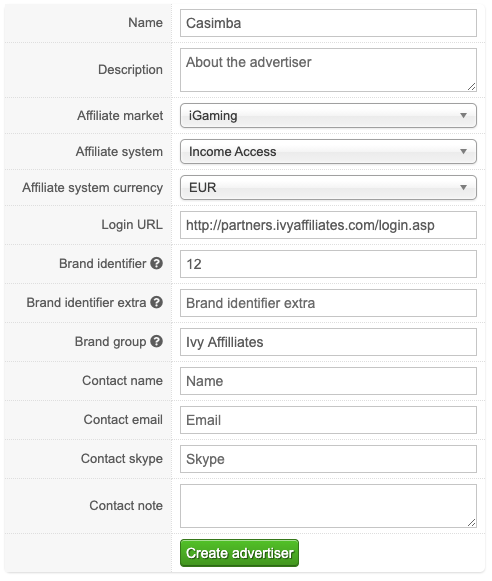
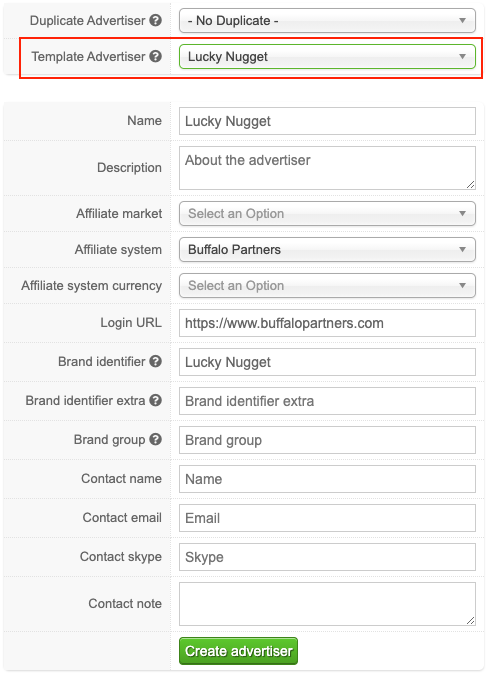
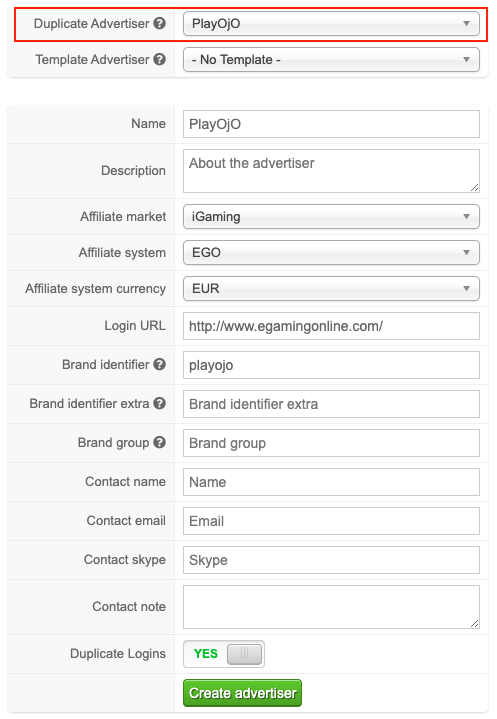
How to add Advertisers

We have 4 different methods to add your Advertisers in Voonix:

  1. Add info manually
  2. Use our Advertiser Template Advertiser from our brand database
  3. Duplicate one of your existing Advertisers and info
  4. Upload CSV file with Advertisers and info

Add Advertisers manually
  1. Go to Advertisers in the menu
  2. Click “Create”
  3. Fill out advertiser info:
    Name: Name of the advertiser/brand
    Description: Advertiser description (Optional)
    Affiliate market: iGaming or Finance
    Affiliate system: What affiliate system is used by the brand/operator?
    Affiliate system currency: What currency is used on your account?
    Login URL: The URL for the login page
    Brand identifier: If you have multiple brands on your account and want to split the stats. For some affiliate systems, the Brand ID is required. See here how to find Brand IDs
    Brand group: Add a name here if you want to group your Advertiser with other Advertisers. (Optional)
    Contact info: Add the contact info of your affiliate manager. (Optional)
  4. Click “Create advertiser”
screenshot

Search for these types of Advertiser information in our Brand Database here


Advertisers Template prefill
  1. Go to Advertisers in the menu
  2. Click “Create”
  3. Go to the Template Advertiser dropdown and search for the brand in the list
  4. Voonix will fill out advertiser information from our Brand Database.
    Note: We don't garuantee all info being correct or available. Please check if you need to add any required information on your own.
  5. Click “Create advertiser”
screenshot

Duplicate Advertiser
  1. Go to Advertisers in the menu
  2. Click “Create”
  3. Go to the Duplicate Advertiser dropdown and search for one of your existing advertisers in the list
  4. Voonix will duplicate the advertiser information.
    Note: Enable the Duplicate Logins option if you want to duplicate logins too.
  5. Click “Create advertiser”
screenshot

How to add Advertiser Logins

  1. Go to Advertisers logins in the menu
  2. Pick the Advertiser in the dropdown and click Select
  3. Fill out account info:
    Type: Pick the type of deal you have on the account
    Username: Add your username
    Username: Add your password
    Account Group: Add a name here if you want to group your login with other logins. (Optional)
    Key 1 & Key 2: Add API key if required. See here which affiliate systems require API keys
    Currency: What currency is used on your account?
    Revshare: Add revshare % (Leave 100% in revshare because we import your commission. Except for these affiliate systems: 888, GVC, PrimePartners, SoftSwiss)
    CPA: Add your CPA value
    Note: Add your notes (Optional)
  4. Click Create
screenshot

If you want to check that everything is correct, you can do a manual import for your account. Simply click the "Import stats" button on your advertiser login page:

screenshot

After import, go to Advertiser earnings and check your stats.

You don't see any stats? Check if you have stats on your account. If you do, please contact us or check our FAQ section (Coming soon) for troubleshooting.

Note: We have a CSV solution for creating Advertiser logins. Read more here

How to add Sites

  1. Go to Sites in the menu
  2. Click “Create”
  3. Fill out site info:
    Name: The name you will see in the list
    Site group: Add a name here if you want to group your site with other sites. (Optional)
    Site URL: URL for your website
    Country: Pick a country for your website. Global can be picked if you have multiple geos on one website
  4. Click “Create site”
screenshot

Next step is to link your campaigns/marketing sources to your site. See how to link your campaigns/marketing sources in the "How to link Campaigns" section on this page.

How to set up County earnings

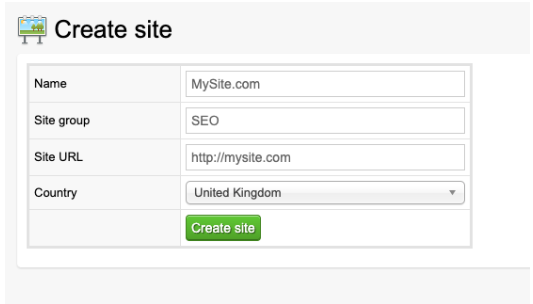
If you want an overview of your different geos in Voonix, you need to use the Sites module. This is a manually set up, where you link your campaigns in Voonix to your Sites.

The main steps are:

  1. Add your Sites in Voonix
  2. Assign a country to your Sites
  3. Link your campaigns to your Sites. See how to link campaigns in the next section.

When you have linked your campaigns to your sites, you can see your stats for the linked campaigns under Site earnings and Country earnings.
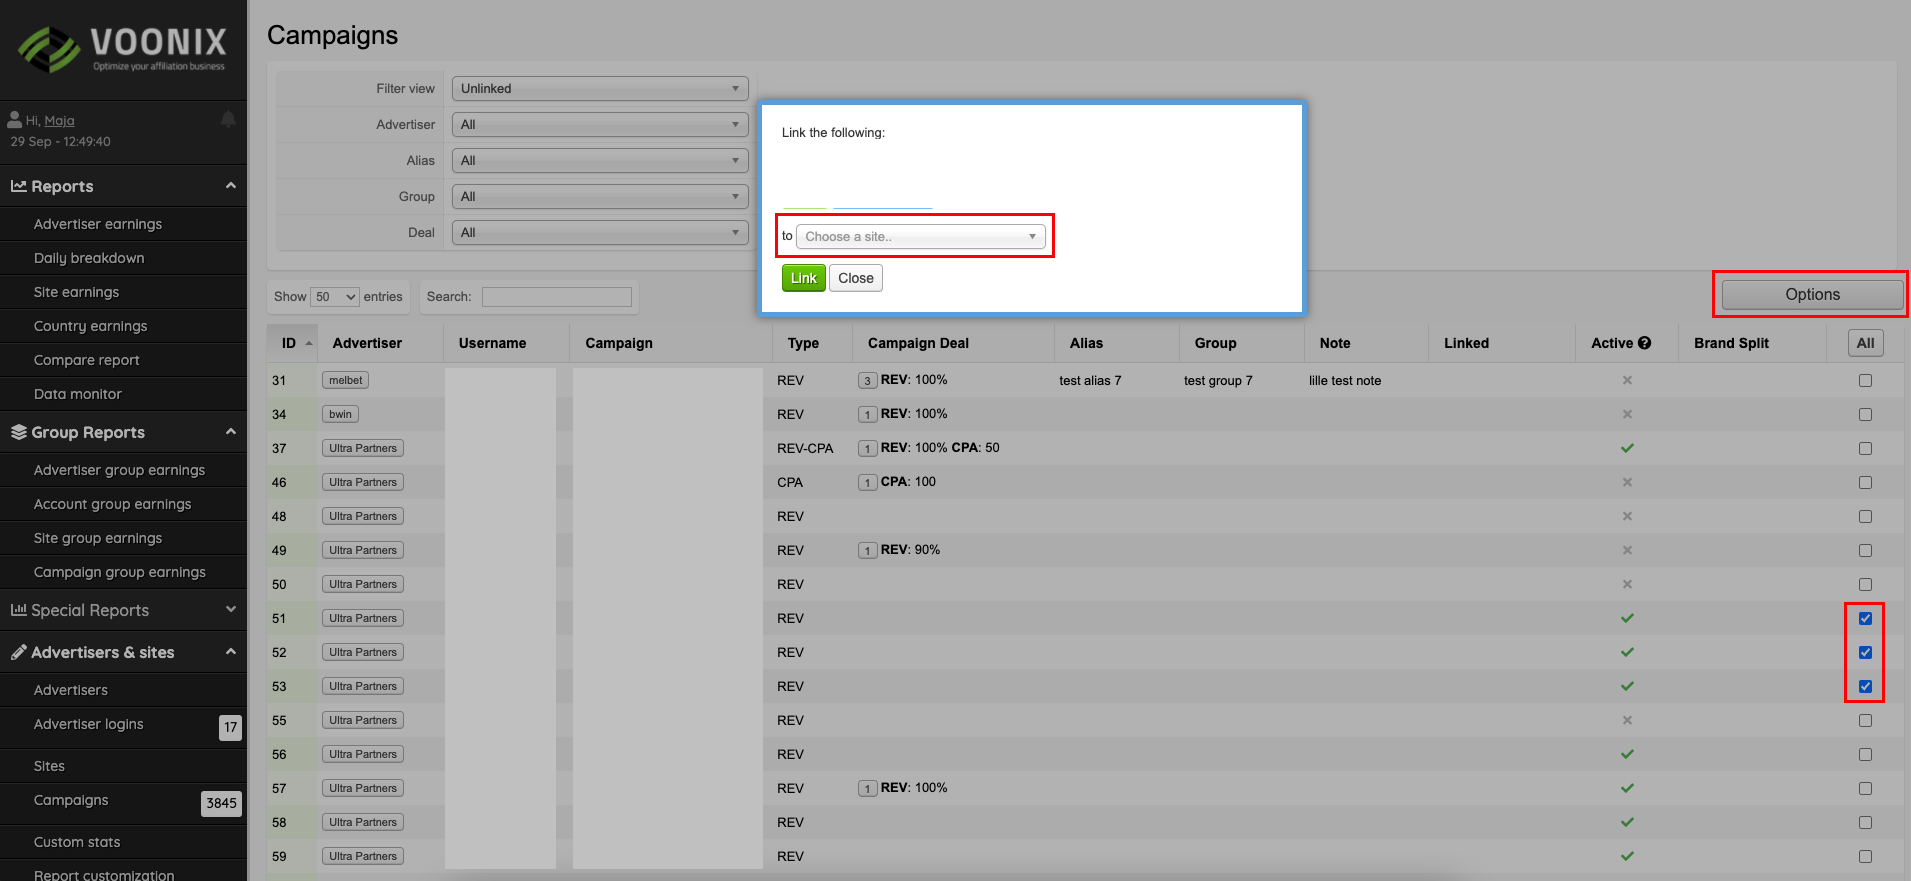
How to add Custom stats

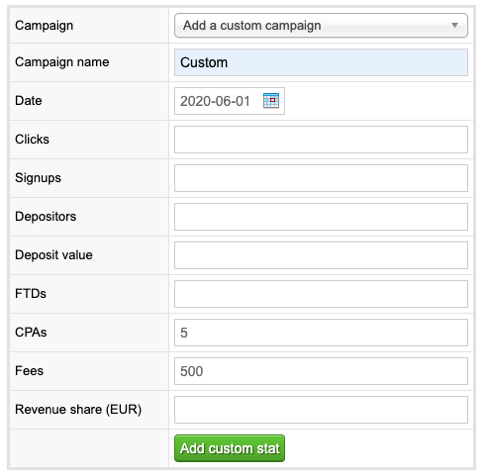
With the Custom stats modules you can manually add stats to your Advertisers in Voonix.

  1. Go to Custom stats in the menu and click Create
  2. If you are adding custom stats from an affiliate system we don’t support, you still need to create an Advertiser and Advertiser login in Voonix. Just pick "Manual input" when creating the Advertiser.
  3. Choose advertiser in the dropdown and click Next
  4. Choose Campaign
  5. Pick date
  6. Add alle the custom data you want, and click Add custom stat
screenshot

The custom stats will now be visible in your reports.

You can also use our CSV Upload feature for Custom stats. Read more here.

How to add Users

  1. Go to Users in the menu and click Create
  2. Fill out Username, Password, Display name and User level
  3. Click Create
screenshot

Note: A new user will not be notified at this point. You need to send username and password to the new user.

Our 4 user levels:

  1. Admin: can do everything
  2. Editor: can do almost everything except managing users
  3. User: can see everything but can’t edit.
  4. Site user: can only see stats for specific sites that you choose

How to change User password

  1. Click Profile in the menu, pg click your username in the top of the menu. Just below the logo.
  2. Fill out new password and click Edit profile

Administrator can also reset passwords for other users: Go to Users --> Click Options --> Click Reset Password. A autogenerated password will be created, and the user can change it under Profile setting after logging in.

How to set up Payment, Payers and Invoices

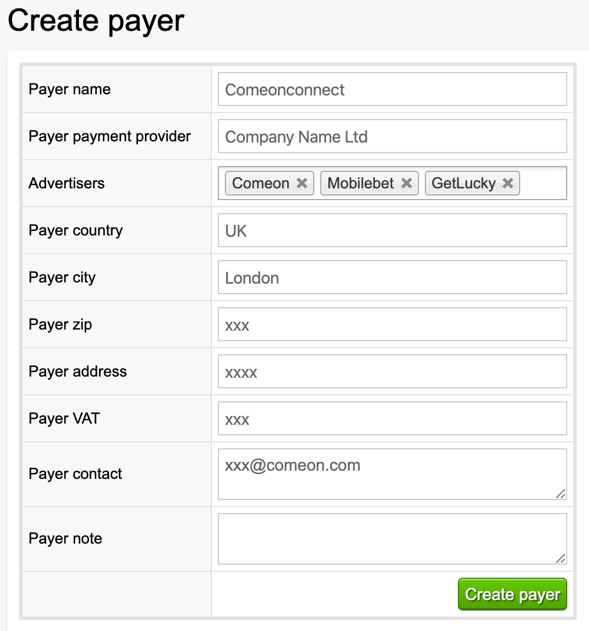
Use the Payment and Payers modules to keep track on your earnings and payments from your operators. Use the Invoice feature to generate invoices directly from Voonix.

Payers: Your operators/brands you get your payments from
Payments: Payment months

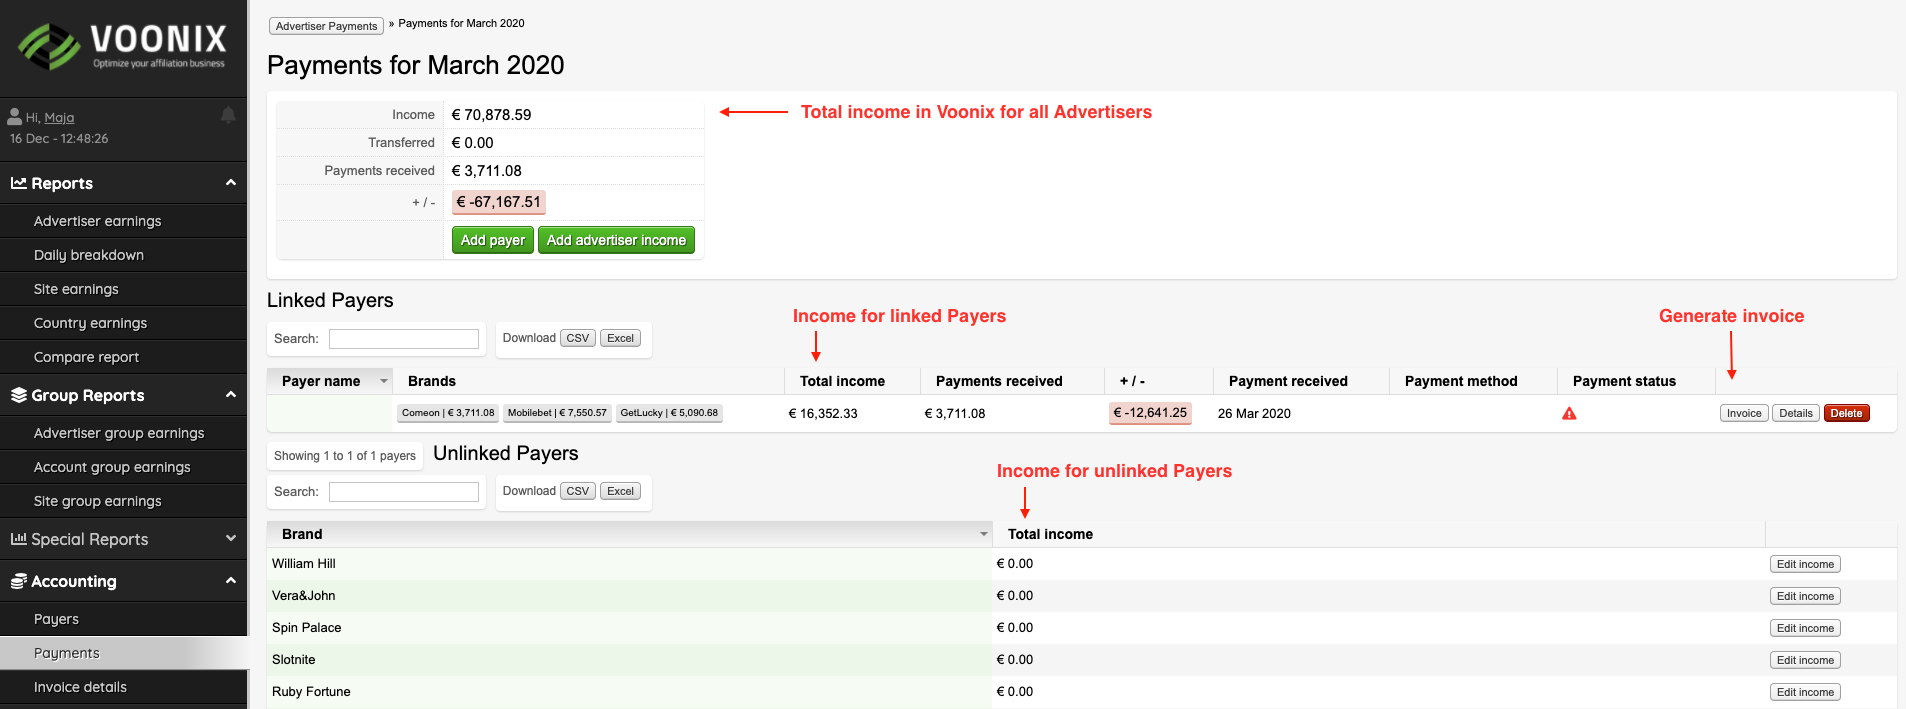
After adding your Payers and Payments months, Voonix will synchronize your income for each month, and you will get the complete overview of received vs. missing payments from your operators.

If you want, choose to generate a PDF invoice directly from Voonix to each Payer from each Payment month.

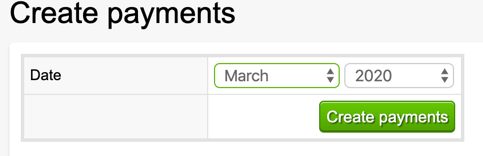
Step 1: Create Payers

  1. Go to Payers in menu
  2. Click Create payer
  3. Fill out the required fields and click Create Payer
screenshot

Step 2: Create Payment month

  1. Go to Payments in menu
  2. Click Create payment month
  3. Pick date and click Create payments
screenshot

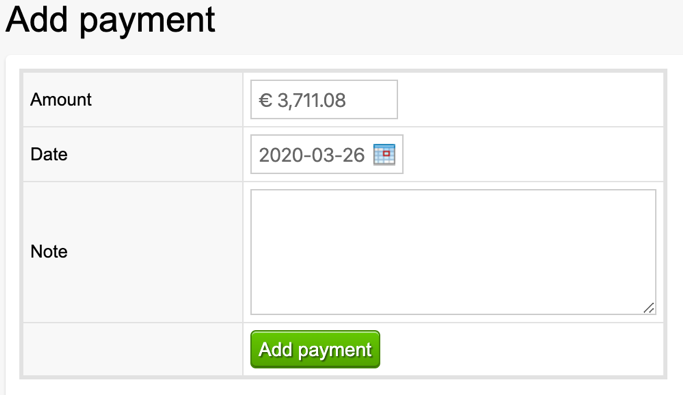
Step 3: Add Payment from an operator

  1. Go to Payments in menu
  2. Choose payment month and click Details
  3. Find the Payer under linked payers and click Details
  4. Find the brand and click Add payment
  5. Fill in Amount and Date and click Add payment
screenshot
screenshot

Step 4: Create Invoice

Go to Payments amonth overview shows in the picture above. Under Linked Payers, you can click "Invoice". This will generate an invoice for all advertiser/brands linked to the payer. You can also create separate invoices for advertisers/brand, by clicking "Details" and then clicking "Invoice" within each brand.

Under "Details" for each Payer, you can also set a payment status.

Note: You update your company informations for your invoices under Invoice details in the menu.

How to manually import stats

  1. Go to Advertiser login and pick the advertiser
  2. Go to the Import stats box and choose the period and choose all logins or a single login
  3. Click import stats
screenshot

How to import historical stats

You can import your historical stats manually as explained above. But this needs to be done for one advertisers at the time.

By using the Import schedule function, you can import historical data much faster for all your advertisers at once:

  1. Go to Import schedule in the menu
  2. Click edit on one of the hourly imports
  3. Pick another month (e.g. January 2020)
  4. Click Edit import
screenshot

By changing the hourly imports like this, the server will import data for ALL advertisers from January 2020 to May 2020 between 12:00 and 16:00. After this, all hourly imports will be for the current month again. You keep changing the months until you have all the historic data you want.

Note: Make sure all your Advertiser imports work, so you don’t need to do this set up twice.

How to update deals

If your deal changes, you can easily update it in Voonix. If you just want to change/overwrite the existing deal, choose option 1. If you want to add a new deal in Voonix AND keep the old deal, you can use the History deal function decribed in option 2.

Option 1: Change the existing deal

  1. Go to Advertiser logins in the menu
  2. Select the advertiser in the dropdown
  3. Go to Options button to the right and click edit
  4. Change the deal in the box to the left (Not in the History deal box to the right!)
  5. Click update
screenshot

This will just change you existing deal and all stats will use this new deal.

You can also use our CSV Upload feature for updating your deals in Voonix. Read more here.

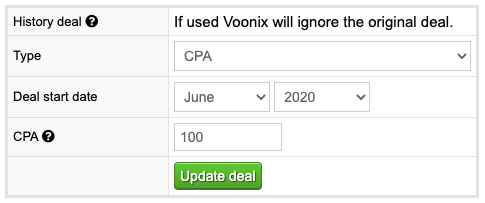
Option 2: Add new deal and keep old deal in Voonix

  1. Go to Advertiser logins in the menu
  2. Select the advertiser in the dropdown
  3. Go to Options button to the right and click edit
  4. Use the History deal option to the right and add your new deal with a start month.
  5. Click Update deal
  6. screenshot
  7. Voonix will now show you the prevous and new deal like this:

  8. screenshot

With this example, Voonix will use the old deal for data imported before June 2020 and the new deal for data imported after June 2020.

How to export stats

You can export your different reports in Voonix.

Simply click the CSV or Excel button in the top of your reports:

screenshot

API Module

You can also use API Module to export your data in JSON format, more on this coming soon.

How to change currency

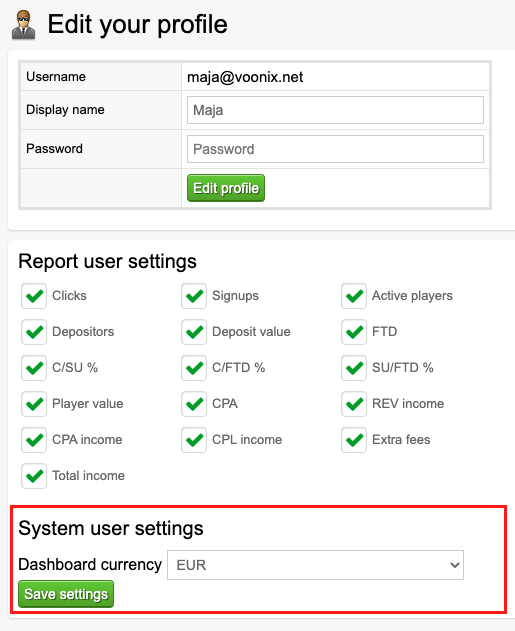
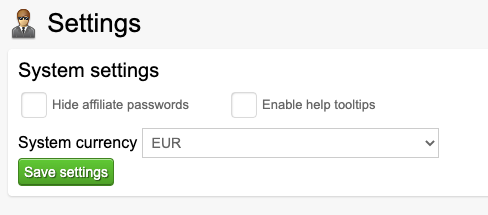
In Voonix, you can change the dashboard currency and system currency showing in your reports. This is two different settings:

Dashboard currency:

  1. Click you profile name in the top
  2. Choose currency under System user settings
    This will only change the dashboard currency
  3. screenshot

System currency:

  1. Go to Settings in the menu
  2. Choose currency under System currency
    This will change the currency for all reports
  3. screenshot

How to edit report columns

Choose what columns you want in your reports:

  1. Click Profile in the manu or click your profile name in the top of the menu
  2. Choose columns under Report user settings
  3. screenshot
  4. Click Save settings

How to use CSV upload for Advertisers and Advertiser logins

You can use the CSV upload function to add Advertisers and Advertiser Logins in Voonix or for editing existing Advertisers and Advertiser Logins.

You need to create one file for Advertisers and required information and one file for Advertiser Logins with required information. Download our two CSV template files to help you get started.

" aria-hidden="true" data-prefix="fas" data-icon="download" role="img" xmlns="http://www.w3.org/2000/svg" viewBox="0 0 512 512" data-fa-i2svg="">

Download CSV Template

Click here to download templates and documentation

Advertiser CSV Template:
screenshot
Advertiser logins CSV Template:
screenshot

Note: The advertiser name must be unique and 100% identical in both sheets or it will fail.

How to upload the files to Voonix:

  1. Go to Advertisers or Advertisers logins in the menu
  2. Click "Upload CSV" in the top of the page
  3. Select file from your computer
  4. Select File delimiter
  5. Click Upload file
  6. Match your file fields with Voonix fields and click Next step
  7. Voonix will show your Advertisers and Advertiser logins from your file with all informations. You can edit info or remove rows
  8. Click Add/edit advertisers/advertiser logins

If you use the CSV upload function to edit your Advertisers or Advertiser logins, Voonix will replace any new information from the files with your existing information in Voonix.

How to use CSV upload for Custom stats

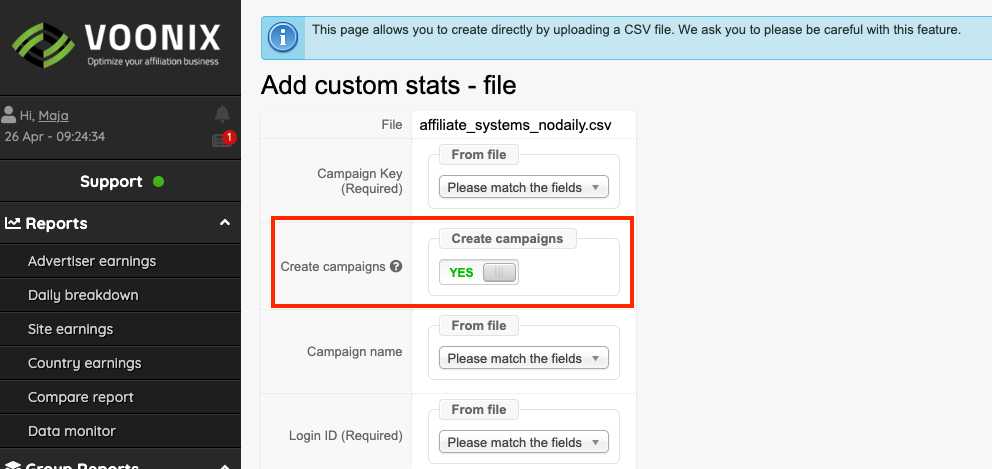
Upload your custom stats with our CSV upload feature. Download our CSV template file to help you get started.

" aria-hidden="true" data-prefix="fas" data-icon="download" role="img" xmlns="http://www.w3.org/2000/svg" viewBox="0 0 512 512" data-fa-i2svg="">

Download CSV Template for Custom Stats

Click here to download template.

Custom Stats Template:
screenshot

Fill out Campaign Key and Login ID (ID for the Advertiser Login) from Voonix. Voonix can only upload custom stats if correct Campaign Key and Login ID are added in the file.

Then fill out the custom stats for each custom campaign. You can have multiple rows with custom stats.

How to upload the file to Voonix:

  1. Go to Custom stats in the menu
  2. Click "Upload CSV" in the top of the page
  3. Select file from your computer
  4. Select File delimiter
  5. Click Upload file
  6. Match your file fields with Voonix fields and click Next step
  7. Voonix will show rows matched with an existing campaign key and Login ID. You can edit the custom stats or remove rows
  8. Click Add custom stats

Create new custom campaigns when uploading:

In stead of adding an alreadu existing campaign to the file, you can also create new campaigns when uploading your file with custom stats:

  1. Make sure you have a column in your file with Campaign name
  2. Upload you file according to steps above
  3. Enable the Create campaign toggle (see image)
  4. Map what column Voonix shall use as Campaign name
  5. Map all other fields as decribed above and click Add custom stats
screenshot